Key Benefits
- Create goals in enform.io to group Jira activity by goal.
- Provide a starting point in updates to provide the current status on each of your objectives.
- Begin to track metrics and tasks for your goals.
- View all previous commentary provided by goal as well.
Creating Goals
Quarterly goals and objectives are often managed in HR systems, or using other manual tools. By managing your goals in enform.io you’re immediately living and breathing them, and seeing them used in daily summaries sent to you. By providing an update on the progress towards objectives and outcomes you’re going to forced to focus more strategically.
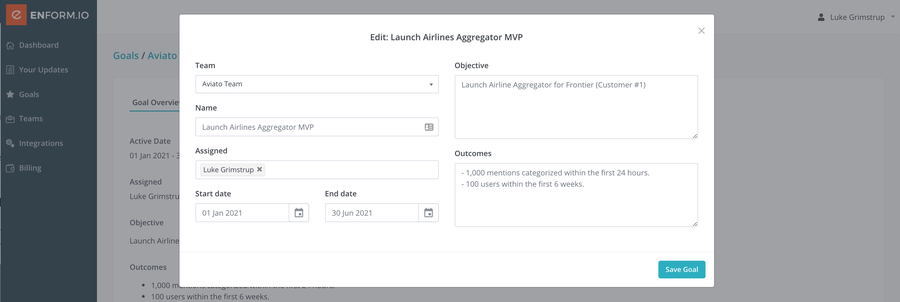
To create a Goal you link to a new goal from the dashboard when linking epics, or go to Goals > New Goal.

- Team if you have more than one team on your account you can allocate the goal to a team.
- Name is the name or objective of the goal. The name is included as a heading in updates.
- Assigned allows you to assign the goal to one or more other team members. This will default to the user creating the goal.
- Start Date and End Date allows you define the duration of the goal. This will default to the current quarter.
- Objective is where you outline the outcome the goal is trying to achieve. This is included as a subheading under the goal whereever it’s mentioned.
- Outcomes is best suited as a dot-points that outline the success measures of this objective. Outcomes here are just used for reference.
Epics and Goals
When kicking off an initiative there might be a series of tactics you might want to build out in order to achieve those the desired outcome. Connecting epics to goals allows you to quickly view a summary of product delivery related to a goal.
There are two ways to link epics to goals. One way to is to link epics to goals from the dashboard, alternatives you can add epics to a goal in bulk by providing a comma separated list of Epic IDs.
Metrics and Goals
Measuring your progress towards outcomes is vital. With enform.io it’s easy to track progress with shortcut links to systems of truth where reports and dashboards might exist. Quickly create and set up metrics for a goal and quickly track current state every so often.
To create a new Metric go to the Goal > Metrics and select ‘Add metric’

- Name is the name of the metric and appears as the heading in the metric tile included in update. It’s recommended to keep this quite short.
- Description is where you describe what this metric is in a bit more detail. This is included as the subheading and help text for the metric.
- Report URL is an optional field where you can provide a link to the source of truth for the information.
- Unit is the unit of measure, what are you measuring is it ‘customers’, ‘%’, or ‘$’ or something else completely customer
Tasks and Goals
If you have to-do lists everywhere from on paper, or in your favourite to-do app, it’s great for tracking your own activities but often doesn’t work when you’re trying to work with others to track key activities and outcomes collaboratively.
Using to-dos within goals allow you to track what needs to be done and is a useful tool for 1:1s to collectively split tasks and responsiblities or just track major milestones.
To create a to-do go to Goal > Tasks and enter the task details.

- Task is the name of the task and what you want to achieve.
- Assignee is who the goal is assigned to.
- Due Date is the when the task will be due.
All these details are included when attaching a task summary in updates.
Comment History
As you regularly provide updates on progress towards your goal, sometimes it would be nice to be able to go back through all your previous updates to understand how you’ve progressed or if there’s a common trend about what’s stuck or not progressing as well.
The comment history is a collection of all the commentary provided in a goal as you’ve provided updates. These are presented in reverse chronological order, so the most recent comments appear at the top. An option here is add a comment directly to the goal, which is treated as an internal comment and is not included in any updates. This is useful if you’re capturing additional details in 1:1s relating directly to a goal.

- Add a note using markdown in the comment section.
- Comment attribution comments are attributed to the person who created the update with the date time of when the comment was created or when the update was published. If the comment had an emoji attached this is displayed as well, or if it was internal it appears with the ‘internal’ flag.